Creating/Deleting Groups
Creating a Group
***All registered users can create a group on the hub.***
- Log in to the Hub.
- Navigate to https://yourhub.org/groups, then click the Create a New Group button.
- On the Create a New Group Page, first fill in the Group ID which is the group’s name that is in the URL.
- Fill in the group’s title or the name of the group that user’s will see.
- Fill in tags to connect your group with words to make it easier to find using Hub searches. A tag is like a subject, keyword, or category.
- Create the public and private group descriptions. The public description will allow any users of the Hub view a brief overview of the group. The private description will allow group members understand any group goals or concepts.
- Under Membership Settings Join Policy, select the button next to the access level you would like to give to members.
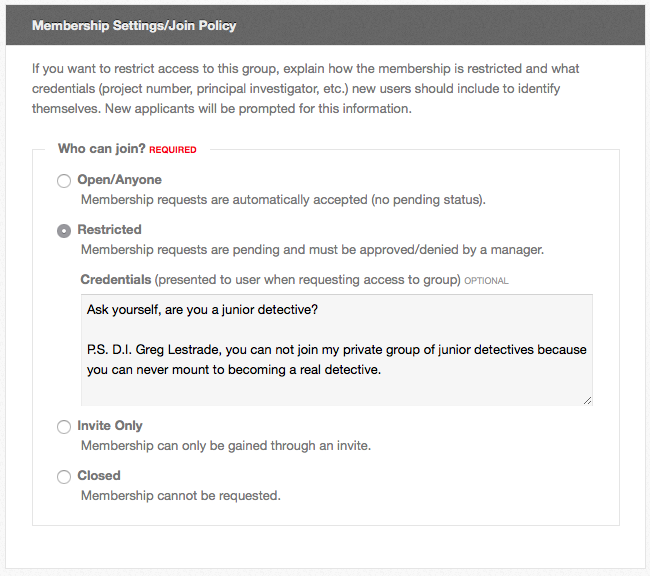
- Public: Any user on the Hub can join the group.
- Restricted: Qualifications are given that predetermines who can join. These restrictions have to be added into the credentials. The group manager must approve these group members.
- Invite Only: A group manager has to send an invite any new group members to the group.
- Closed: No one can join the group unless they are added from the back-end of the Hub.
- Under Privacy Settings, select a discoverability setting for the group.
- Hidden: A hidden group is not listed on the front-end of the Hub, and any content is unavailable to any user that is not a member of the group.
- Visible: A visible group can be found on the Hub through regular searches.
- Set access permissions for each tab by using the drop-down to select who can access or control each component in the group.
- For the Group Email Settings, check the box to automatically subscribe new group members to the group email thread or discussion thread.
- Once all the group’s content has been filled in, then save the new group by clicking Save Group. Once the initial group has been saved, pictures and files can be uploaded to the group.
Deleting a group
***To delete a group you must be the manager of the group and the sole member.***
- Log in to the frontend of the Hub and locate the group that is to be deleted and click the group title to open into the home page.
- On the group home page, hover over the Group Manager controls.
- In the drop-down, select Delete Group.
- You will be taken to a page to confirm all items in the group that will be lost.
- The group will be permanently deleted from the Hub.