Overview
Tool Development Process
Each hub relies on its user community to upload tools and other resources. Hubs are normally configured to allow any user to upload a tool. The process starts with a particular user filling out a web form to register his intent to submit a tool. This tells the hub manager to create a new project area for the tool. The user then uploads code into a Subversion source code repository, and develops the code within a workspace. The user can work alone or with a team of other users. When the tool is ready for testing, the hub manager installs the tool and asks the development team to approve it. Then, the hub manager takes one last look at the tool, and if everything looks good, moves the tool to the "published" state. Of course, a tool can be improved even after it is published, and re-installed, approved, and published over and over again.
The complete process is explained in the tool maintenance documentation for hub managers. Additional details about this process can be found in the following seminars:
Creating Graphical User Interfaces
If a tool already has a graphical user interface that runs under Linux/X11, then it can be published as-is, usually in a matter of hours. There are two caveats:
- If the tool relies heavily on graphics, it may not perform very well within HUBzero execution containers. Our containers run in cluster nodes without graphics cards, and are therefore configured with MESA for software emulation of OpenGL. This has much poorer performance than ordinary desktop computers with a decent graphics card, so frame rates are much lower. Also, all graphics are transmitted to the user's web browser after rendering, again lowering the frame rate. You can expect to achieve a few frames per second in the hub environment--good enough to view and interact with the data, but far below 100 frames/sec that you would normally see on a desktop computer.
- Tools running within the hub have access to the hub's local file system--not the user's desktop. Many tools have a File menu with an Open option. When a user invokes this option within the hub environment, it will bring up a file dialog showing the hub file system. The user won't see his own local files there unless he uploads them first via sftp, webdav, or the hub's
importfilecommand.
The graphical user interface for any tool published in the hub environment can be created using standard toolkits for desktop applications--including Java, Matlab, Python/QT, etc.
If you're looking for an easy way to create a graphical interface for a legacy tool or simple modeling code, check out the Rappture Toolkit that is included as part of HUBzero. Rappture reads a simple XML-based description of a tool and generates a graphical user interface automatically. It interfaces naturally with many programming languages, including C/C++, Fortran, Matlab, Python, Perl, Tcl/Tk, and Ruby. It creates tools that look something like the following:
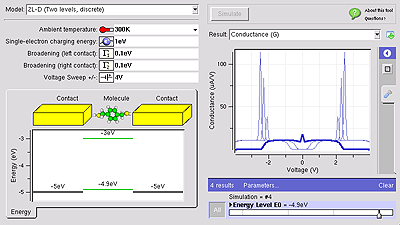
Rappture was designed for the hub environment and therefore addresses the caveats listed above. All Rappture-based tools have integrated visualization capabilities that take advantage of hardware-accelerated rendering available on the HUBzero rendering farm. Rappture-based tools also include options to upload/download data from the end user's desktop via the importfile/exportfile commands available within HUBzero.
For more details about Rappture, see the following links:
- Rappture Quick Overview
- Developing Scientific Tools for the HUBzero Platform (introductory course with 7 lectures)
- Rappture Reference Manual