Publications
Curation Workflow
Turning on Curation:
- From the backend, navigate to Components -> Publications.
- Click the Options button.
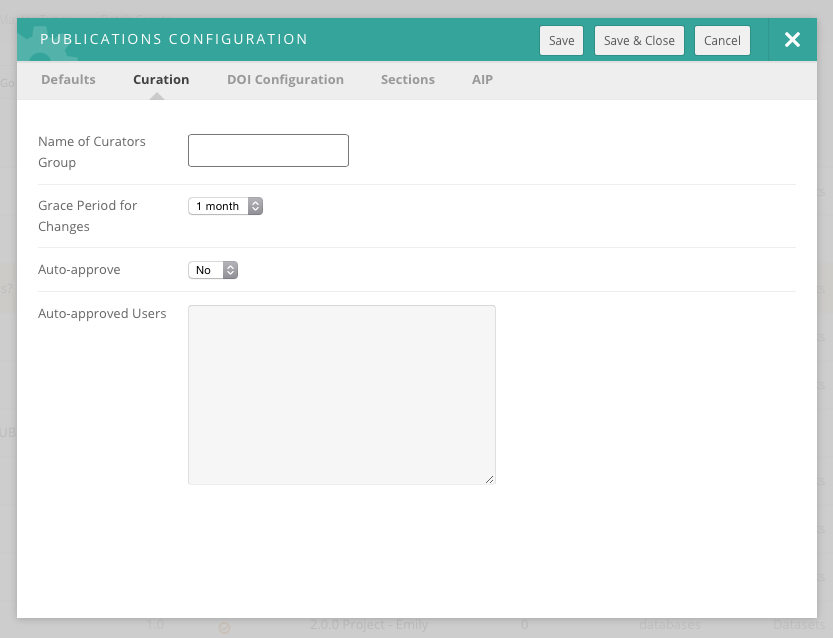
- Click the Curation tab.
- Select ON in the Curation field.
- In the Name of Group of curators field, type in the CN of the group you want to give curation rights to.
- Optionally, select 1 month in the Grace period for changes box if needing to give users the ability to change the publication after it has been published.
- Note: mkAPI will not run until the one month grace period if set.
- Click Save & Close to ensure the changes and are submitted.
Auto-Approve Publications
If you would like certain users to have their new Publications by pass the Curation steps, you can add them to a list where their Publications are auto-approved. To add users to this list, follow these steps:
- Navigate to the backend of the HUB and click on Publications underneath the Components drop-down.
- Inside of Publications, click on the Options button.
- Click on the Curation tab and then insert the usernames of the users who's Publications are to be auto-approved.
- Click Save & Close to save the changes.
Enabling Databases
To enable databases within Publications:
- Log onto the administrative backend.
- Go to Components
- Go to Publications
- Go to Master Types submenu item.
- Select the checkbox next to the “Database” table row.
- Click the Edit Button.
- Find the “Content” block for the Databases Type.
- Click the [Edit] button next to Block Elements
- Locate the “Type” drop-down, change “file” to “data”
- Change the “Maximum count” to 1.
- Save the Block Element
Creating a Publication License
- Navigate to the backend of the Hub and click on Components and from the drop-down click on Publications
- Open up the Licenses tab and then click the New button in the upper right hand corner of the page
- Start filling out the License Information:
- Title: The title of the license
- Name: The name of the license, full name if the license is an acronym
- URL: The webpage that all the legal license information
- About: The background information about this license
- Content: The parameters of the license such as what content this license supports
- Icon: Path to icon image that lives in the Media Manger on the HUB
- Once you have filled out the License Information, begin filling out the License Configuration:
- Active: If this license should be automatically published and available on the frontend for users to use after saving
- Customizable: Should the license text be customizable for publication authors to edit
- Agreement required: Forces publication authors to
- Once you have finished filling out the information for the license, click Save & Close
Selecting a Default Publication License
- Navigate to the backend of the Hub and click on Components and from the drop-down click on Publications
- Open up the Licenses tab and locate the Default column
- Locate the license that should become the new default and select the box beside the license title
- Click the Make Default button and the license will be made the new default
Publishing/Unpublishing a Publication License
- Navigate to the backend of the Hub and click on Components and from the drop-down click on Publications
- Open up the Licenses tab and locate the license you want to publish or unpublish
- In the Status column you can click on the check-mark or cancel sign to change the status of the license
- After clicking on the status icon the new status will be automatically saved
Reordering Publication Licenses
- Navigate to the backend of the Hub and click on Components and from the drop-down click on Publications
- Open up the Licenses tab and locate the Order column
- Rearrange the licenses by clicking the arrows facing up and down
- The final ordering you leave the licenses in will appear the same inside of Publications on the frontend of the Hub inside the License drop-down when creating a new publication
Creating Publication Categories
- Navigate to the backend of the Hub and click on Components and from the drop-down click on Publications
- Open up the Categories tab and then click the New button
- Begin filling out the Category Information:
- Name: The name of the new category
- Alias: The shortname of the new category
- URL Alias: The URL name for the category
- dc:type: The Dublin Core Meta Data type
- About: A short introduction describing what type of publication files and content are stored in this category
- Determine what plugins you want to connect to the this new Publication Category
- Fill out the Item Configuration:
- Status: Determine if the category is active (publish) or inactive (unpublished)
- Contributable: Determine if the category can be contributed to
- Determine the Custom Fields by creating new fields or managing the preexisting files. The fields determine the layout of the Publication overview page:
- Reorder: Drag and drop the different field rows to change the order
- Field name: Change the name of the field title
- Input Type: Determine the amount of text that can be inputted in this field from the drop-down
- Required: Check the box to make the field required for the publication author to fill out before publishing the publication
- Review the information and then click Save & Close
Publishing/Unpublishing a Publication Category
- Navigate to the backend of the Hub and click on Components and from the drop-down click on Publications
- Open up the Categories tab and locate the license you want to publish or unpublish
- In the Status column you can click on the check-mark or cancel sign to change the status of the license
- After clicking on the status icon the new status will be automatically saved
Handling Publication Options
- Navigate to the backend of the Hub and click on Components and from the drop-down click on Publications
- Open up the Publications tab and then click the Options button in the upper right hand corner of the page
- Inside the Publication Options, the different areas of Publications can be managed and adjusted as needed:
- Defaults:
- Component ON/OFF: Turning on or off Publications
- User Contributaions Outside of Projects: Allow users to contribute to Publications outside of Projects
- Email Notifications: Allow component to send out emails
- Default Category: Newly created Publications will automatically be defaulted to this category if not selected by the publication author
- Default Publication Thumbnail: Path to default publication, used as a placeholder
- Default Video Thumbnail: Path to default video, used as a placeholder
- Default Image Thumbnail: Path to default image, used as a placeholder
- Default Master Image: Default image for Publication page cover, used as a placeholder
- Publication Files: Master path for restoring published data
- URL to Documentation: URL to page with Publication information
- URL to Terms of Deposit: URL of Terms of Deposit page on the HUB
- Curation:
- Name of Curators:(Hub) group members authorized to perform pre-publication curation (all publication types) and manage curation assignment
- Grace Period for Changes:Allow authors to make changes to a published resource within the grace period after approval
- Auto-approve:Automatically approve new submissions
- Auto-approved Users:A comma-separated list of usernames to be auto-approved
- DOI Configuration:
- About DOI Link: a link to an explanation of what Digital Object Identifiers (DOI) are [optional]
- DOI Namespace Start: First part of DOI namespace (what goes right after doi: and before /,e.g. 10.5072)
- DOI Namespace End: Hub-specific DOI namespace end (usually 2-3 characters going after /, e.g. F2K
- DOI Service URL: DOI service address
- DOI Service User/Password: DOI Service/Password
- DOI Publisher: Publisher name (may use full HUB name) for DOI service
- DOI Resolve URL: URL for resolving DOI's
- DOI Verification URL: URL for verifying DOI's
- Issue master DOI for Publication?: Master DOI links to /main page listing all previously published versions
- Sections:
- Contributors: Show/Hide the list of authors on publication page
- Format Author Display: Format list of authors on publication page
- Ranking: Show/Hide the ranking
- Rating: Show/Hide the rating
- Date: Show/Hide the date on the publication page
- Linked Data: Show/Hide a link to an OAI-ORE compliant linked data representation in the HTML source for each publications
- Citation: Show example/instructions for citing this publications.
- Suggest License: Allow users to suggest licenses
- Citation Format: Choose format for citations
- Supported Tag: A tag to display to indicate Org supported tools
- Supported Link: A link display to describe Org supported tools
- Audience Link: URL to a page describing audience levels.
- AIP:
- Trusted Digital Repository: Trusted Digital Repository
- AIP Path: AIP path (for trusted digital repos)
- MkAIP Admin Group: Group of administrators to get notification about archived dataset
Master Types: Editing Block Information
- Navigate to the backend of the HUB and click on the tab Components
- From the drop-down click on Publications
- Inside of Publications, click on the tab Master Types
- Click on the name of the Master Type that you want to edit block information in
- Locate the Block you wish to edit
- A Block is a section of the Publication that holds information about the materials being published (i.e. description, abstract, etc.)
- Find the Block Elements section and click the Edit in brackets
- Change the block information as fit, for example below is a use case of a small issue that occurs in some Master Types with the abstract switching with the description:
- In this case the abstract and description mappings are incorrect. There is a section that tells the block which field the Publication versions table what to map from the content block. Here, one would switch the description alias and name from "abstract" to "description" and vise versa.
- Click Save & Close to save these changes
Setting Up Group Association with a Publication
Groups can be associated with a Publication that was not published from a Project owned by any groups. Only one group can be given association rights. Usually a group is associated with a Publication if the group contributed materials or resources that helped with the Publication's development or if the group helped fund this Publication. To set up the ability for users to associate groups with their Publications, follow these steps:
- Navigate to the backend of the Hub
- Hover over Components and click Publications from the drop-down
- Inside of Publications click the Master Types tab
- Click the title of the Master Type that you want this feature to be enabled on
- Under the section called Blocks and Configuration locate the Authors block
- Locate the Show group ownership and allow to be assign group ownership and change the drop-down to be Yes
- Click Save & Close and this feature will be enabled on this Master Type
- Enable this on each Master Type that you wish for this feature to be enabled