Projects
Overview
Projects is a project-management/collaboration tool. Whether working on a new funding proposal, research paper or developing an application, projects are a great way to manage your data, workflow and communication. Projects can be created by groups or individual users, and may include multiple groups in the team.
With each project you get:
- a Git-based repository for data and apps with a built-in web browser;
- a Wiki area for project notes;
- To-do list management;
- a Facebook-like microblogging tool providing a stream of project updates from all team members, with the ability to comment on certain activities.
Projects can be accessed by going to /projects on your hub. You can read in more detail about all project features by going to /projects/features.
Creating Projects
Starting a Project
-
Login into your HUB
- Navigate to https://yourhub.org/projects
- Click Start a project
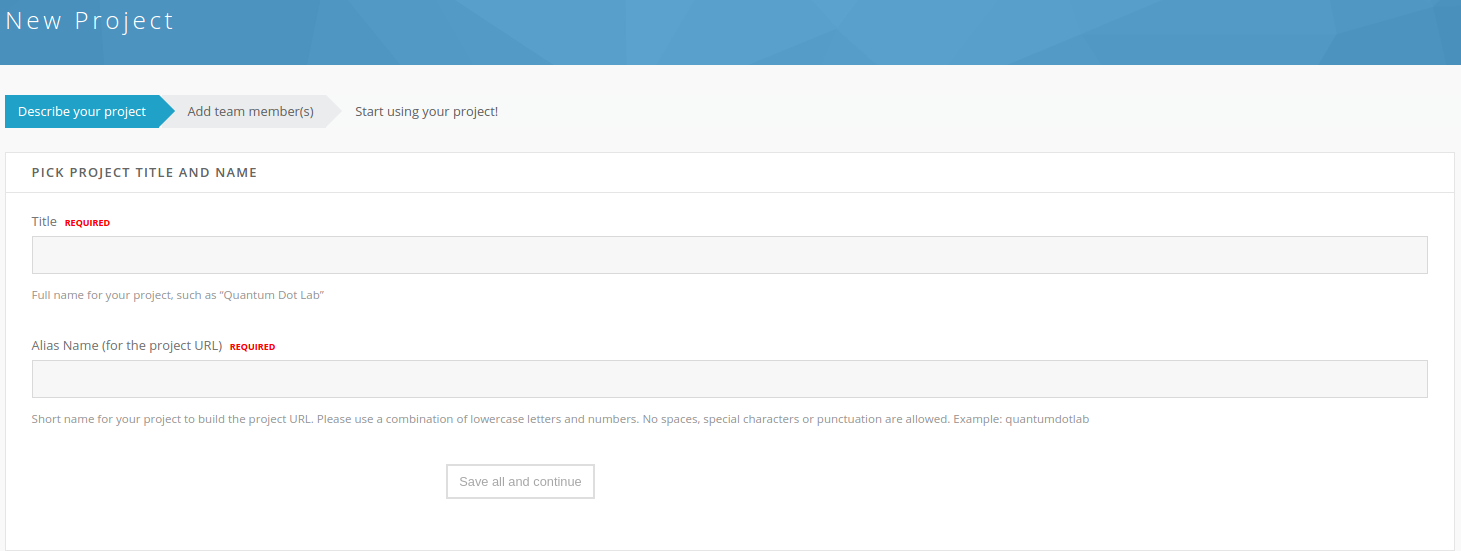
- Provide a title in the Title textbox. This should be the full name of the project
- Provide an alias in the Alias textbox. This is a short name for the project used in the project URL therefore spaces, special characters, or punctuation cannot be used
- Under Describe your project click Yes, I'll do it now
- Optionally, add a description of the project in the About textbox or upload an image to use as the project thumbnail
- Under Include project in search? select whether the project should be private or public. If public is chosen, then the project can appear in search results and have its basic information available for public viewing
- Click Save all and continue to move to adding initial team members
Adding Initial Team Members
- Select the level of access that should be granted:
Collaborator can:
- Upload and manage project files.
- Edit project publications.
- Use available project tools.
Manager can:
- Invite or remove other team members.
- Change project information and global settings.
- Do everything a collaborator can do.
- Start typing last name of the user to add in the Individual textbox, or the group name of the group to add in the User Group textbox
- An autocomplete box will appear below these textboxes with suggested users or groups (depending on the textbox used). Click on the suggestion that is associated with the user or group that should be added
- Click Add to have the user or group added to the team
- Repeat steps 1-4 above to add additional users or groups to the team
- Check the box next to the names of the users that should be removed and click Delete
- Click Save all and continue when finished adding users
Finalizing the Project
Depending on the HUB configuration, reading information on HIPAA or FERPA rules on privacy as well as agreeing not to store certain types of data may be required.
- Read the statement:
"No, this project will not include any sensitive or restricted data such as HIPAA protected health information (PHI) or student information. I understand that this site cannot be used to store government restricted, export-controlled, or proprietary company data (without permission)." Check the box next to it to indicate agreement.
- Click the word Privacy Terms to read the Privacy Terms
- To indicate agreement with this statement:
"Yes, I read, understand and acknowledge Privacy Terms as they relate to the use of this project. I am responsible for ensuring compliance with these terms for all project members." Check the box next to it.
- Click Save all and continue. The project is now ready to use
Adding a Project Thumbnail/ Editing Project Information
- Login to your Hub
- Navigate to https://yourhub.org/projects
- Click on the Project you want to edit on the My Projects section
- Hover over the Project Manager text in the upper right and click Edit Project
- The project title can be changed by changing the text in the Title textbox
- The About textbox allows you to add/ change the description of the project
- Click Choose File in the Picture section to select a thumbnail image
- Find the image you want and click Open
- Click Upload to add the thumbnail to your Project
- After you have finished making the changes you want, click Save Changes
- The Project info has been saved. notice will appear at the top if the changes were successfully saved
- Click Return to project page to navigate back to the project
Editing the Team
- Login to your HUB
- Navigate to https://yourhub.org/projects
- Click on the Project you want to edit in the My Projects section
- Click the Team tab on the left menu
- Click Edit Team
- If you do not see the Edit Team button and are listed as a manager for this project, then it is likely that this is a project that was created within a Group. If this is the case then all membership must be controlled on the Group level
Adding Team Members
- Select either Manager or Collaborator depending on the level of access you want to give the user or group:
Collaborator can:
- Upload and manage project files.
- Edit project publications.
- Use available project tools.
Manager can:
- Invite or remove other team members.
- Change project information and global settings.
- Do everything a collaborator can do.
- Start typing last name of the user you'd like to add in the Individual textbox, or the group name of the group you'd like to add in the User Group textbox
- An autocomplete box will appear below these textboxes with suggested users or groups (depending on the textbox you use). Click on the suggestion that is associated with the user or group you want to add
- Click Add to have the user or group added to the team
- Repeat steps 1-4 above to add additional users or groups to the team
Removing Team Members
- Check the boxes next the names of the users you want to remove
- Click Delete to permanently remove the selected users from the group
Deleting a Project
- Login to your Hub
- Navigate to https://yourhub.org/projects
- Click on the Project you want to edit in the My Projects section
- Hover over the Project Manager text in the upper right and click Edit Project. In the lower right below the Edit Info box there is the text "Need to cancel project?"

- You have an option to permanently delete your project
- Click on the word delete in that phrase
- Click Yes, Delete to verify that you intend to permanently remove the project
- The Project will now no longer exist
Changing the Layout of the "To-Do"
- Navigate to https://yourhub.org/projects and log into the hub
- Locate a project and click on the blue title to open up the project
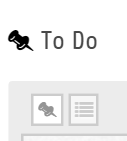
- Select the To-Do tab on the left side of the page
- To change the layout of the To-Do page, click the Pinboard view button or the List view button
- Pinboard View will sort the pins inside the To-Do from newest proceeding to oldest.
- List view will sort the pins inside the To-Do from newest proceeding to oldest; pins will be stacked horizontally.
Sharing Project Notes
- Navigate to https://yourhub.org/projects and log into the hub
- Locate a project and click on the blue title to open up the project
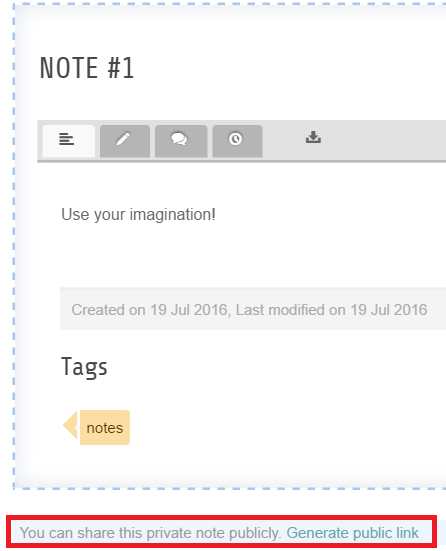
- Select the Notes tab on the left side of the page
- Locate the note that you would like to share publicly
- At the bottom of the published note, click the blue link Generate public link
- A link will be provided in the pop-up
- This public link allows others to access content by people outside of your project team. You can send the link to anyone by pasting them into your emails, instant messages, and web pages.
- To exit the pop-up, click the Close this button
Project Feed Module
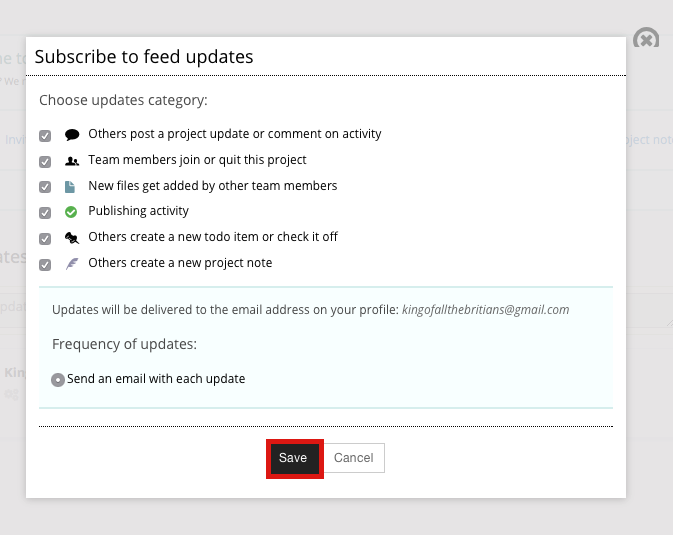
Users can subscribe to a feed module inside of Projects and receive email updates whenever there is activity inside the Project. To enable the Project feed updates, follow these steps:

- Navigate to the Project of your choosing
- Inside of the Project, locale the Feed Module and click on Subscribe to feed updates
- Inside the Feed Module, select the categories that you wish to receive updates about, then click Save
Projects: How do you connect Google Drive, Dropbox, or GitHub to a Project?
Note: You must be the creator or manager of the project in order to connect with a file connector.
- Navigate to https://yourhub.org/projects
- Access the project that you wish to add your the file connector of your choice
- Inside of the project, click on Files
- Select from the dropdown the file connector
- Complete authentication into your Dropbox, GoogleDrive, or GitHub account
- Return to the project, and you will have a connection with the files and folders in that account
Projects: How can I view file history in Projects?
Each project comes with a Git repository to store your files and data. With this comes a built-in web file browser, which reads the repository and allows to do multiple-file uploads, delete, rename and move files around, compile LaTeX files into PDF, as well as view file history, diff revisions and download all previous versions. In addition, we are now working on a solution for you to use the full power of Git for advanced file management through direct Git commands.
To view file history, click on the date in the Modified column in the Files area. This will show you the history of the file, and any previous versions if they have been uploaded.
Projects: What are “My To-Dos” in Projects?
Inside of Projects there is a special feature where tasks can be posted and assigned to members of the project. On the right side of the page under the lists of to-do’s are the My To-do’s. This is the list of all to-do lists assigned to you. The default to-do list is a list of all to-do’s inside of the project. You will see your personally owned to–do lists by clicking on My To-do’s. To add a new to-do list, simply click onAdd. When you create a new to-do item, you can choose from the list any of the to-do lists you created. You will not be able to add to My To-do’s because this is a default list that is automatically populated with to-do items assigned to you.
Why does my file say N/A in my Project files?
It defaults to N/A if no timestamp is found. Whatever command it’s using to retrieve the timestamp is either not returning it or not retuning it in a way the PHP code is expecting.