Resources
Approving Pending Resources
Depending on whether auto-approval for user-submitted resources on a hub is turned on/off, you may need to watch for newly submitted resources awaiting for administrator approval to be published on the hub. The administrative dashboard shows whether there are any resources pending approval.
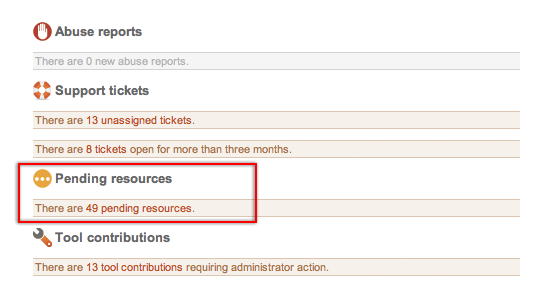
In the screenshot above, the dashboard says there are 49 pending resources. By clicking on the link “49 pending resources”, you will be immediately taken to the resource manager. Resources that need your approval will be marked with a distinct icon as seen in the screenshot below.
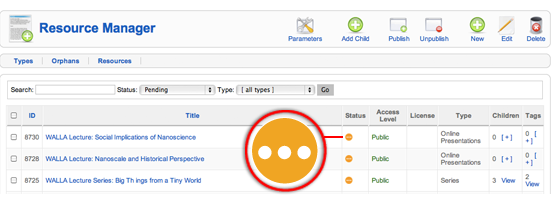
You can publish a pending resource just by clicking on the orange status icon, or you can first click on the resources title and select appropriate status from the detailed resource page, as shown on the screenshot below.
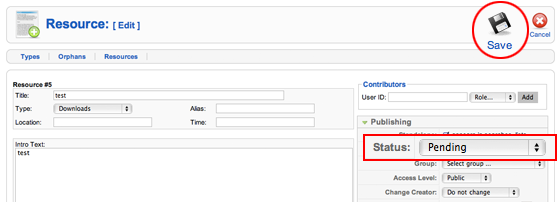
From the detailed resource page you can also decide when the resource should get published and unpublished by setting Start Publishing and Finish Publishing dates. As soon as a new resource is published, it will appear in site search as well as in What's New area of the site.
Creating Courses
Here's how to create a "Course" Resource...
- Begin by logging on to the administrator side of the site (
http://yourhub.org/administrator/)
Here's a simplified sample of how a course is set up:
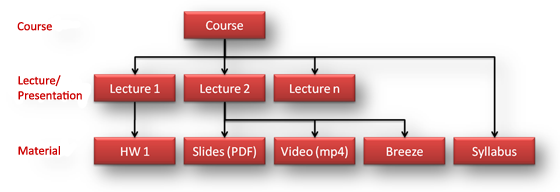
This is the structure that you will be creating.
NOTE: Before starting, it is important to include a note about naming conventions. Be as descriptive and consistent as possible. This is important because it helps to create consistency throughout your hub by applying the same naming structure to similar files. For example, a possible PDF name could be 2010.09.03-ECE565-L10.pdf (which includes date, course, and lecture). Remember, a user might download several PDF's from your course, so it helps to distinguish them appropriately.
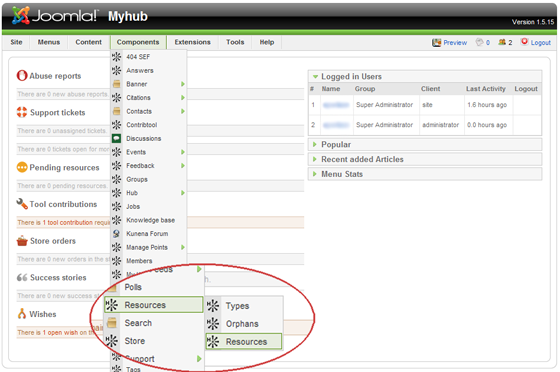
- Select "Resources" from the "Components" menu at the top of the screen
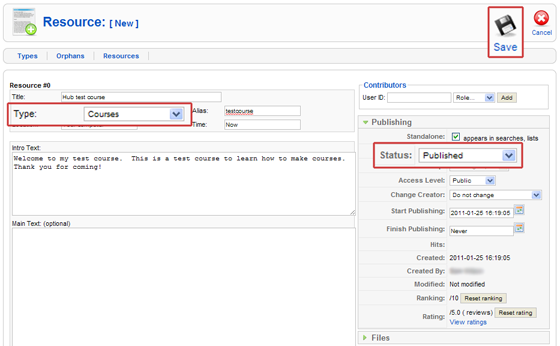
To start, create the highest level of the structure: the "Course"
- Select "New" from the top right corner buttons (do not select "Add Child")

- Enter the data for your course
- Make sure that the "Type" field is set to Course (this is not the default!)
- Also be sure to "Publish" the course (using the drop-down box on the right)
- And select save
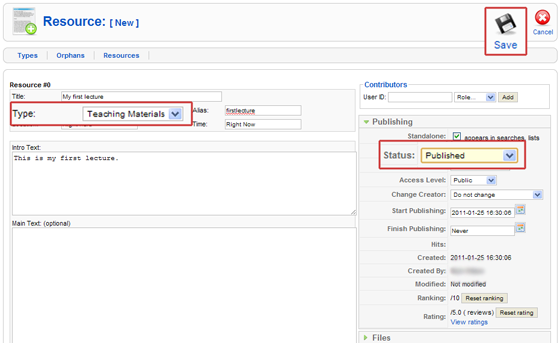
Now it's time to create the Lecture for the course (the second level)
- Select "New" again from the top right corner buttons (again, do not "Add Child" yet)
- Now create a Lecture
- The type of actual resource chosen for a lecture is not important
- This relationship is established via a parent/child designation, not by resource type
- A good option is "Online Presentation" or "Teaching Material" for the Lecture resource type
- But don't forget, the resource type is important for the "Course" resource
- Type in the information for this lecture
- Select an option for "Type", such as "Teaching Material"
- Be sure to publish this resource as well
- Select save
NOTE: A lecture is not an actual resource type, but that is how it will be referenced in this documentation, as that is its function within a typical course
Now you should have your "Course" resource and your "Lecture" resource showing up
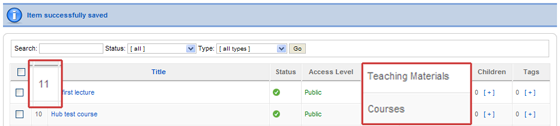
- Note the resource number of your "Lecture/Teaching Material" (in this example it is 11)
- Next, click the "[+]" button in the "Children" column and in the row of your Course Resource (i.e. the first resource that was created; which was 10 in this example)
- Select the "Add existing - Resource ID:" radio button, and type in the resource ID of the "Lecture/Teaching Material" that was created
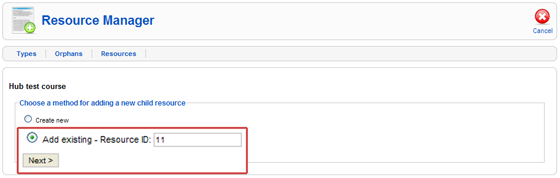
- Click "Next"
You can now see that you have created a parent/child relationship between the course and lecture presentation
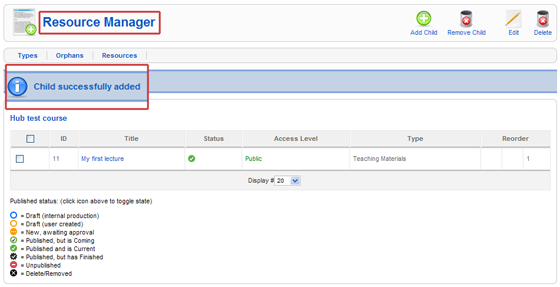
- Click the "Resource Manager" text at the top of the screen to go back to viewing all resources
NOTE: Notice that you now have one child next to your Course resource (this is the lecture resource that you related it to in the previous steps)
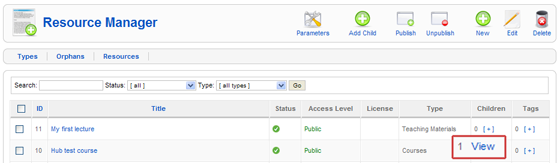
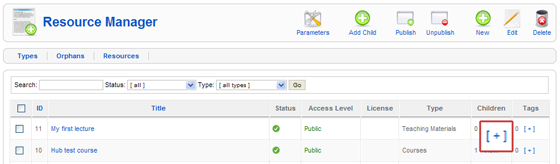
Now, the last step is to add the Lecture material itself (this is tier three of our course structure)
- Select the "[+]" button again, this time next to the Lecture/Teaching Material resource that you created
- Yours might not necessarily be an "Teaching Material" if you chose to label it something different
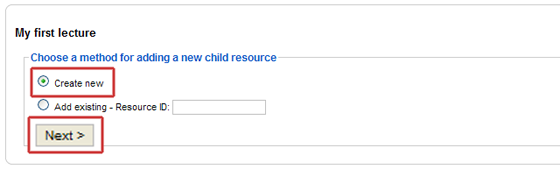
- This time leave the radio button on "Create New" and click "Next"
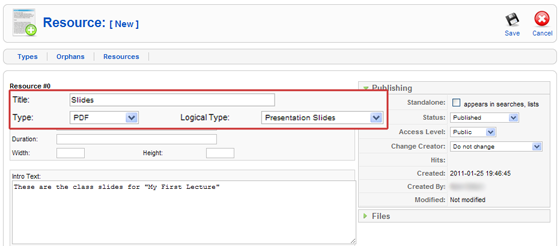
Here you add the actual file to be played for the "Lecture/Teaching Material" that you are creating
- Type in the info about this media item being uploaded for the course
- Select the appropriate information (for this file, a PDF of class slides is being uploaded, that's why "PDF" and "Presentations Slides" are chosen)
- Remember the note on naming conventions mentioned at the beginning of this section
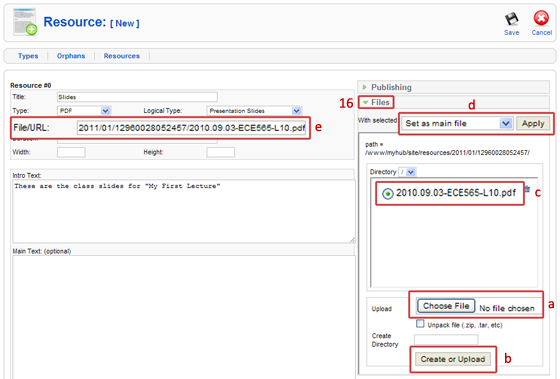
- Now, select the file box on the right to upload the file for this Lecture
- a) Click in the browse box and locate the file on your computer
- b) Back in the file box, click "Create or Upload"
- c) Then select the radio button for the file that you uploaded and make sure the "With Selected" drop down box above says "Set as main file"
- d) If so, click "Apply" next to that drop down box
- e) This will add the URL to the "File/URL" box to the left
NOTE: When uploading "Breeze" files, place all of the files associated with that video in a .zip folder. Then select that .zip folder to upload in the upload box shown below. Also select "Unpack File". Once uploaded, continue with the process below, while simply setting the main file as the "viewer.swf" file.
- Now select Save
You have successfully created a three tier structure for your "Course". The first level is the "Course" that was created first. Then the "Teaching Material" was created; this was also called a Lecture. Then a file was added to that Lecture.
At this point, more lectures and files can be added to a Course. To add a different file type to a given lecture (say you want to post a video and a PDF for the same lecture), just follow steps 13 and following, and create a new Child under the appropriate lecture (simply click on the resource for your lecture, and click the "Add Child" button on the resource page for that lecture). You can also add more lectures to the course. Simply follow steps 5 and on, creating a new resource and then adding that existing resource as a child of the main Course resource as was done in this example. The reason resources are created in two different ways in this example is due to how they are set up. When clicking the "[+]", a child type resource is created. When the "New" button is used from the main resource page in Joomla, a parent type resource is created. The course and lecture are parent type resources (evening though you add the lecture as a child to the course), and the material is the child type resource.
Just remember, the structure/hierarchy is very important for this to work properly. Pay careful attention to maintain the structure outlined above.
Note concerning "Series": The theory outline above holds true for creating a series. A series is simply a two level structure (as opposed to three), where the series is created in the same way a lecture was, and the series resources are the children.