Modules Manager
Overview
The Module Manager is where you add and edit Joomla! Modules. In Joomla!, Modules are used to display content and/or media around the main content.
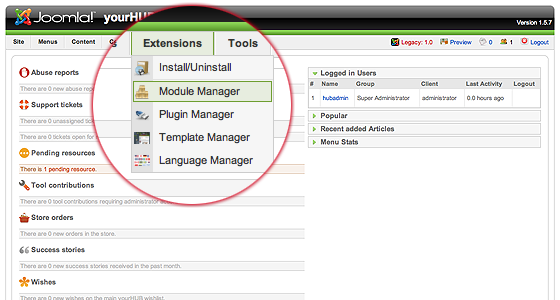
The Module Manager can be found by selecting "Extensions" > "Module Manager" from the drop-down menu on the back-end of your HUB installation.
Module Facts:
- All Joomla! websites require at least 1 Menu Module
- All Other Module Types are Optional. (Examples: News, Banner, Latest News, Polls)
- Every Menu is accompanied by a menu module. (Example
mod_mainmenu) - Multiple occurrences of similar module types.
- Some Modules are linked to components. For example, each Menu Module is related to one Menu component. To define a Menu in Joomla!, you need to create the Menu and Menu Items using the Menus screens and then create the Module for the Menu using this screen. Other Modules, such as Custom HTML and Breadcrumbs, do not depend on any other content.
A HUBzero installation is accompanied with over 20 Joomla! default module types and additional, HUBzero-specific modules.
Column Headers
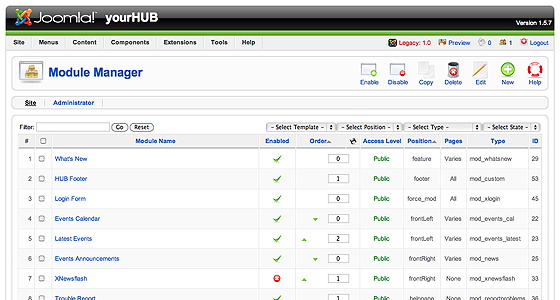
Click on the column heading to sort the list by that column's value.
- #
- An indexing number automatically assigned by Joomla! for ease of reference.
- Checkbox
- Check this box to select one or more items. To select all items, check the box in the column heading. After one or more boxes are checked, click a toolbar button to take an action on the selected item or items. Many toolbar actions, such as Publish and Unpublish, can work with multiple items. Others, such as Edit, only work on one item at a time. If multiple items are checked and you press Edit, the first item will be opened for editing.
- Module Name
- The name of the Module. You can click on the name to open the Module for editing.
- Enabled
- A green tick or a red X showing whether the use of the component is enabled/disabled. Click the icon to toggle the item between enabled and disabled.
- Order
- The order to display modules within a Position. If the list is sorted by this column, you can change the display order of modules within a Position by selecting a Position in the "Select Position" filter and then clicking the arrows or by entering the sequential order and clicking 'Save Order'.
- Access Level
-
Who has access to this item. Current options are:
- Public: Everyone has access
- Registered: Only registered users have access
- Special: Only users with author status or higher have access
You can change an item's Access Level by clicking on the icon in the column.
- Position
- The position on the page where this module is displayed. Positions are locations on the page where modules can be placed (for example, "left" or "right"). Positions are defined in the Template in use for the page. Positions can also be used to insert a Module inside an Article using the syntax "{loadposition xxx}", where "xxx" is a unique position for the module.
- Pages
- The Menu Items where this Module will be displayed. Options are "All" for all Menu Items, "None" for no Menu Items, and "Varies" for selected Menu Items. A Module will only display on Menu Items where it is selected.
- Type
- The system name of the Module. Joomla! installs 20 standard Modules. Many Joomla! Extensions contribute additional Modules.
- ID
- The ID number. This is a unique identification number for this item assigned automatically by Joomla!. It is used to identify the item internally, for example in internal links. You can not change this number.
- Display #
- The number of items to display on one page. If there are more items than this number, you can use the page navigation buttons (Start, Prev, Next, End, and page numbers) to navigate between pages. Note that if you have a large number of items, it may be helpful to use the Filter options, located above the column headings, to limit which items display (where applicable).
Toolbars
Primary Toolbar
At the top right you will see the toolbar:
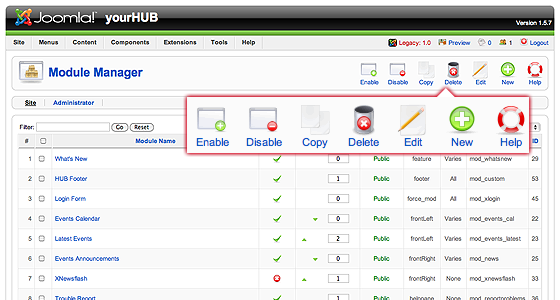
The functions are:
- Enable
- To enable one or more items, select them using the Checkbox and press this button. You may also toggle between Enabled and Disabled by clicking on the icon in the "Enabled" column.
- Disable
- To disable one or more items, select them using the Checkbox and press this button. You may also toggle between Enabled and Disabled by clicking on the icon in the "Enabled" column.
- Copy
- To copy one or more Modules, select them using the Checkbox and press this button. A new Module will be created for each selected Module. The new Module will have the name "Copy of" plus the original Module name. Note that the new copies are initially disabled.
- Delete
- To delete one or more items, select them and click this button. The selected items will be deleted. Note: only empty items can be deleted.
- Edit
- Select one item and click on this button to open it in edit mode. If you have more than one item selected (where applicable), the first item will be opened. You can also open an item for editing by clicking on its Title or Name.
- New
- To create a new instance of a Module, press this button. You will be taken to a screen that lists all of the available Modules. See Module Manager - New/Edit for information about adding Modules.
- Help
- Opens this Help Screen.
Site and Administrator Links
At the top left, above the Filter, you will see the following two links:
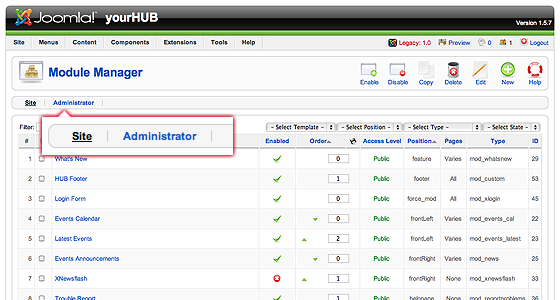
- Site
- OOpens the Site tab. This is the default tab and allows you to manage the Modules for the front end of the web site.
- Administrator
- OThis tab allows you to manage the Modules for the back end administration of the web site. If you do not need to change the Joomla! administrator menus, no modifications are required here.
List Filters
Filter by Partial Title
You can filter the list of items by typing part of the title or the ID number. Or, you can select a combination of Category and Published State.
- Filter
-
In the upper left corner just above the column headings is a Filter field and two buttons, as shown below:
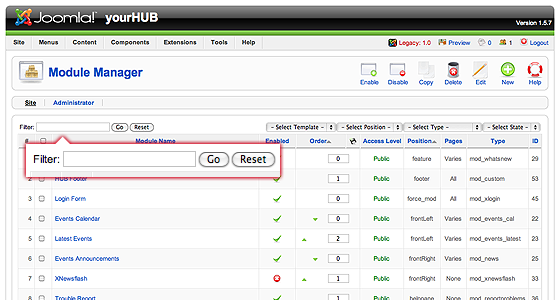
If you have a large number of items on the list, you can use this filter to find the desired item(s) quickly. Enter either part of the title or an ID number and press 'Go' to display the matching items. You can enter in whole words or part of a word. For example, "ooml" will match all titles with the word "Joomla!" in them.
Filter by Template, Position, Type and Published State
In the upper right area, above the column headings, are following drop-down list boxes as shown below:
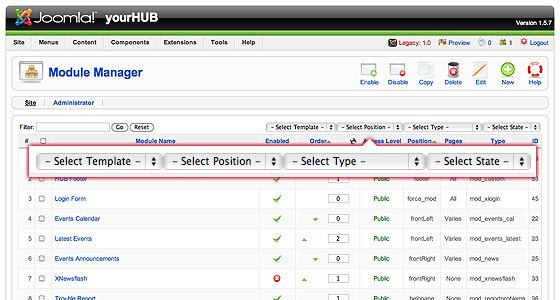
The selections may be combined. Only items matching both selections will display in the list.
- Select Template.
- Select the Template from the drop-down list box of available Templates. Only Templates that are enabled for this site will display.
- Select Position.
- Select a Position from the drop-down list box of available Positions.
- Select Type.
- Select the Module Type from the drop-down list box of available Module Types. Joomla! installs with 20 available Module Types. Additional ones may be available if you have installed any Joomla! Extensions.
- Select State.
- Use the drop-down list box to select the published state: Enabled or Disabled.
Create/Edit Modules
When you create a new Module, you will select the Module Type. This will determine what type of content this Module can display. If you edit an existing Module, the Module Type will already be determined.
Note: You cannot change the Module Type of an existing Module.
All Modules have two sections that are the same: Details and Menu Assignment. The Parameters are different for each Module Type.
Details
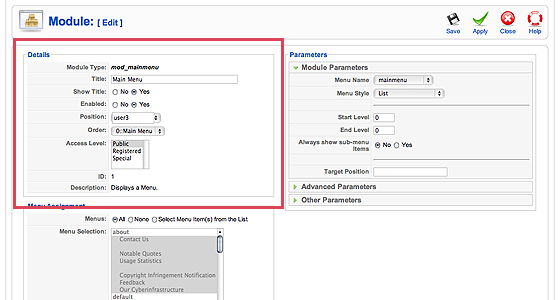
- Module Type
- This displays the system name of the module. No entry is allowed.
- Title
- The Title of the Module.
- Show Title
- Whether or not to show the Title of the Module.
- Enabled
- Whether or not the Module is enabled. If "No", the Module will not be shown on the page.
- Position
- The Position on the page to show the Module. There are two types of Positions you can use.
- You can select a Position from the drop-down list box. The Positions in the list box are those provided by your Template. You can see the available Positions on the page by adding the letters "?tp=1" to the end of any front-end Joomla! URL. For example, if your home page is "www.mysite.com", you can type the URL "www.mysite.com?tp=1". The page will display with labeled rectangles indicating each pre-defined Position for the current Template.
- You can type in a Position that is different from the pre-defined positions (for example, "myposition1"). This type of Position can be used to insert a Module into an Article. If you enter the code "{loadposition xxx}" inside the text of an Article, where "xxx" matches the Position of a Module, and if the Module is assigned to the the Menu Selection where the Article is displayed (see Menu Assignment below), then the Module will be displayed at that point in the Article.
- Order
- The Order that this Module will be displayed within the Position. If more than one Module is displayed at the same position, this will determine the order of display. The drop-down list box shows all Modules displaying at the current Position. Select the Module that you want the current Module to follow.
- You can also change the order of display in the Module Manager.
- The Module Order is only important when two or more Modules are displaying at the same Position and on the same Menu Selections.
- Access Level. Who has access to this item. Current options are:
- Public: Everyone has access
- Registered: Only registered users have access
- Special: Only users with author status or higher have access
Enter the desired level using the drop-down list box.
- ID
- The ID number. This is a unique identification number for this item assigned automatically by Joomla!. It is used to identify the item internally, for example in internal links. You can not change this number.
- Description
- A description of what the Module does. No entry is allowed.
Menu Assignment

This is where you tell Joomla! which pages to show this Module on. This Module will show on the page when this Menu Item is selected. If the Menu Item allows the user to navigate to sub-pages, then this Module will also show on these sub-pages. For example, if the Menu item is a Blog Layout, the Module will also show when the user clicks on a "Read more..." link, an Article Link, or a Page Navigation link from that Blog Layout.
- Menus.
- "All" means show the current Module on all Menu Items. "None" means don't show the Module on any Menu Items. "Select Menu Item(s) from the List" allows you to select which Menu Items to show the Module on.
- Menu Selection.
- If "Select Menu Items(s) from the List" above is selected, select individual Menu Items that will display the Module.
- Use Ctrl+Click to select multiple Menu Items.
- Use Shift+Click to select a range of Menu Items.
- If you want to select most of the Menu Items, first click "All" above under Menus and then click "Select Menu Items(s) from the List". All of the Menu Items will be selected. Then use Ctrl+Click to deselect the Menu Items you don't want to include.
Parameters
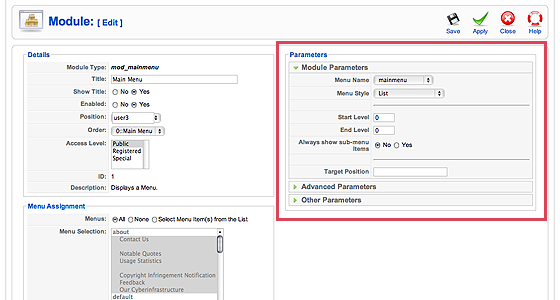
This will vary between modules.