Introduction
This article guides you through the process of designing your own template for a HUB. This is intended for web designers/developers with a solid knowledge of CSS and HTML and some basic sense of aesthetics.
Although many currently available HUBs tend to look somewhat similar, you have the freedom to make your HUB look as unique as you want it to be simply by modifying a few CSS and HTML files within your template folder.
Step 1: Creating a mock-up
It is recommended to start the design of your HUB template by taking a look at a number of other HUBs and websites and deciding which features are important and best serve the goals of your HUB. Having PIs and other team members involved in the process from the start usually saves much time for defining and polishing the design concept. Once you have a good idea of the look and feel of your HUB and its main features, you would normally create a sketch of the HUB front page in Adobe Photoshop or a similar graphics program. Any secondary page will usually keep the header with the menu and login area, and the footer. For creating the Photoshop mock-up, you are encouraged to use the hubtemplate.psd file attached with this article for your convenience (hubtemplate.psd (2 MB, uploaded by Alissa Nedossekina 1 decade 5 years ago)). Make sure to get feedback from others and finalize the mock-up before jumping onto the next step.

Step 2: Building your template
Download a sample template from this page (neutral.zip (5 MB, uploaded by Alissa Nedossekina 1 decade 5 years ago)). You will then rename the template as you desire. Pick a unique short name that characterizes your design or corresponds to your HUB name.
Next, make sure to replace all the occurrences of the template name by performing find and replace within the template directory. Replace the name “neutral” with the name of your choice, e.g. “yourtemplate”. Specifically, the following code lines will need to be adjusted:
- Line 21 in error.php
- Lines 12, 13, 15, 18, 21 and 66 in index.php
- Line 3 in templateDetails.xml
- Lines 180, 187, 191 in css/ie6win.css
Edit default templateDetails.xml with details about your template as necessary.
Template structure
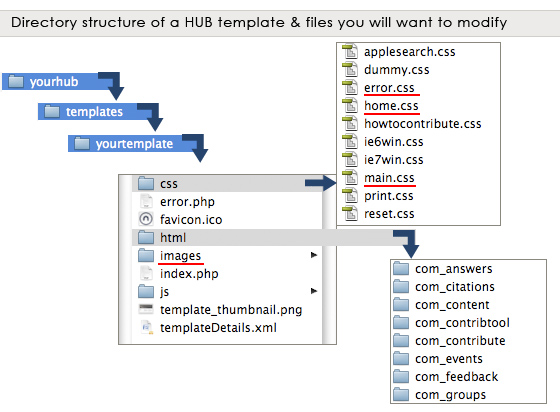
The figure below presents the structure of a typical HUB template. Files underlined in red are those you are most likely to modify. Main.css file in the css folder provides base styling for your HUB, which is usually further extended by individual component CSS files. Home.css file stores styles for the front page, while error.css controls styles for custom error pages. Naturally, images directory is the place to store any images referenced in CSS files.
Extended editing
Occasionally you will want to modify the look of a specific HUB component or a module. You can do so by adding/modifying files in html folder within your template. It is important to point out that one should never change files outside your template directory, otherwise you risk losing your changes with new HUB updates. That is, if you need to adjust the look of Answers component, you would edit answers.css within yourtemplate/html/com_answers, and NOT the one under components/com_answers. CSS & PHP view files within the template directory will override those in main components/modules HUB directories.
On rare occasions you will want to change index.php file, usually to rename login/register buttons, delete or reposition common elements. It is not recommended to touch index.php unless you absolutely have to and are comfortable with PHP and Joomla framework. A lot can be accomplished with CSS edits only. Similarly, changes to error.php should be avoided.
Modifying main.css
Main.css controls base styling for your HUB, which is usually further extended by individual component CSS.
We took every effort to organize the main.css in a manner allowing you to easily find a section and a class name to tweak. E.g. if you want to change the way headers are displayed, look for “headers” section as indicated by CSS comments. Although you can modify all existing classes, depending on your objectives, it is recommended to avoid modifications to certain sections of main.css, as indicated below. While you can add new classes as needed, you should never remove or rename any of the existing classes, or you risk breaking the template display.
Some sections of main.css that you are likely to modify:
Body - may want to change site background or font family.
Links - pick colors for hyperlinks
Headers - pick colors and font size of headings
Lists - may want to change general list style
Header - you will definitely want to change this
Toolbar - display of username, login/logout links etc.
Navigation - display of main menu
Breadcrumbs - navigation under menu on secondary pages
Extra nav - links that appear on the right-hand side in multiple components
Footer
Sections of main.css where you would want to avoid serious modifications:
Core classes
Site notices, warnings, errors
Primary Content Columns
Flexible Content Columns
Sub menu - display of tabs in multiple components
Start modifications to main.css file in the css folder by searching for and replacing some common colors, e.g. those used for links or borders. Performing find and replace across the file will usually save you time.
While it is generally safe to change colors and replace images, adjust floats, margins and paddings with caution.
Template header
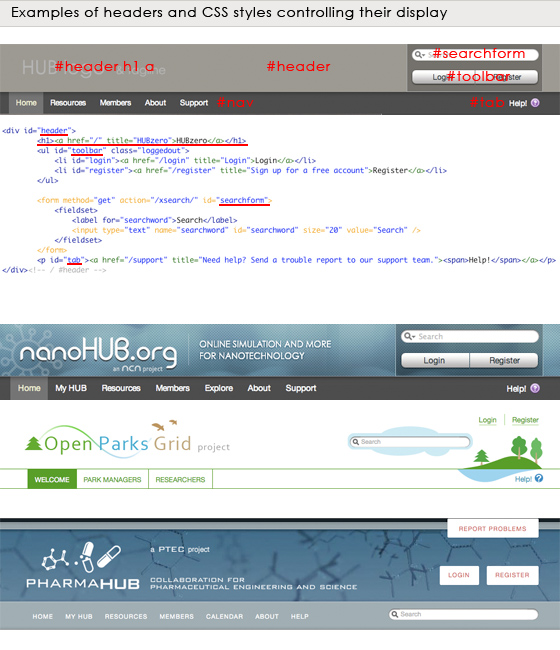
The figure below shows examples of headers on various hubs and the html that builds them. Notice how different headers may look with different CSS. You should be able to change the look of your header by locating and changing the appropriate CSS class in main.css file. Store any new/edited images in the images directory in your template and reference them in main.css as appropriate.
Template footer
Next you will want to change the style of the footer, which is consistent across all pages of the site. You may do so by locating the Footer section in main.css and tweaking its styles. If you would like to have extra navigation as seen on nanoHUB.org, you may add extra styles here and reference them when putting content in HUB footer module.
Refer to Hub Administration Guide for information on how to modify the content of your HUB footer.
Modifying home.css
Use home.css to modify the look of the content of your HUB front page. Specifically, in this file you will find styles for the featured/welcome area, which appear if either banner or welcome module is active.
Modifying error.css
Error.css controls the styles for a custom error page (layout defined in error.php in your template directory). You will likely want this page to look consistent with other pages of your HUB.
Use of content columns
HUB front page will generally have a featured/welcome area below the menu. Right below the featured area you will often see other featured content organized in several columns. The column styles are described under Content Columns sections in main.css. You may want to change column borders or background colors. It is recommended, however, not to change float properties, margins or paddings, or use caution when doing so.
The content of the front page is controlled via administrator back-end. When you edit the home page article (usually entitled “Home” or “Welcome” and accessible through the Article Manager), you can apply any style from main.css (e.g. use threecolumn class for three columns, or fourcolumn for four columns, as shown below). You can also include modules like Events Calendar or What’s New and place them in individual columns. Consult HUBzero documentation (HUB Style Guide) and source code of other HUBs for examples of specific layouts.
Step 3: Installing your template
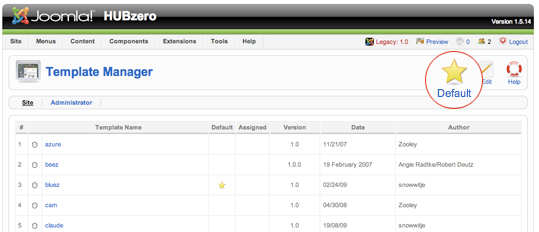
When ready, place your template folder, e.g. “yourtemplate” in the ‘templates’ directory of your HUB. Your template name should appear in the list of available templates under Administrator > Template Manager. To activate your template, select it and click “Default”:
Note: if you don’t see your template in the list, make sure you replaced the default template name in all the files mentioned above in Step 2.
Other tips
Make sure to check your HUB in various browsers. Seeing your HUB in IE6, for example, may be an eye-opening experience.
If you need to include fixes to display in IE browsers, please do so in separate ie6win.css or ie7win.css files in the css folder.
For tips on content editing, please refer to Hub Administration Guide.
More about available HUB CSS styles go to HUB Style Guide.
For CSS reference consult resources at w3.org.